

Yarn Dyeing at Qing Studio
As indie yarn dyers, our small team dedicates immense effort to curate and infuse our yarn bases with fresh, one-of-a-kind colour variations every single day! The process of dyeing our yarn is a journey that encompasses various stages: from conceptualising mood boards, to experimenting with diverse shades, assembling kits, and ultimately dyeing the yarn itself.
We're excited to offer you a glimpse into our passion for yarn dyeing by sharing insights into our meticulous process here at Qing Studio!
In this blog I will walk you through step by step how we prepare, dye, and finish our yarns, ready to get out to you to be made into something beautiful.
@qingfibre Dye yarn with us ready for tomorrows shop update🫶😍 #yarndyeing #knittok ♬ original sound - IRON GAINS
Preparation
1.Yarn Prepping
Prior to starting the dyeing process, we undertake the crucial step of soaking the yarn.
This preliminary soaking serves to enable uniform pigment absorption during dyeing. It effectively eliminates any impurities or oils that could hinder an even diffusion of dye. We immerse our yarn in a mixture of water and citric acid for a few hours. It's essential to avoid excessive soaking, as stagnant water can foster bacterial growth, compromising yarn quality. Alternatively, white vinegar can be used in lieu of citric acid. Ensuring the yarn's security, we also tie it with a cable tie or similar device to avoid tangling.
After soaking, it's important to gently squeeze out the excess water rather than wringing it, in order to prevent patchy or uneven dye dispersion.


2. Dye solution preparation
The next stage involves preparing dye concentrates or dilutions as per specific requirements. This is where science comes in! Depending on the dye stock you choose to use, the process typically entails mixing a small amount of dye powder with water. This affords the flexibility to blend colours and regulate pigment intensity and dilution by varying the water volume.
Our dye mixtures align with the colorways sketched out in our creative ideas. Achieving the desired colours involves significant experimentation and trial-and-error, aimed at achieving perfection. Remember to record measurements for potential future colour replication too!


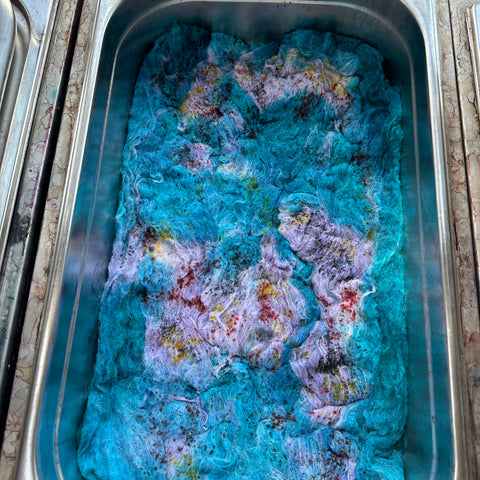
Application
1. Applying the Dye
Lay out the yarn within a pot or pan ready to begin the application process. Our designs and concepts serve as guiding references during this step, which necessitates skillful and technically precise execution. The approach varies based on the pattern—whether speckles, fades, or other intricacies!
Additionally, it's crucial to consider how the dye will appear both in the skein and once knitted. Syringes and squeeze bottles are valuable tools for precise application that we love to use!
2. Fixing the dye
Once the dye has been applied, one of the final steps is fixing it to ensure it fully integrates with the yarn fibres, preventing easy washout. We achieve this by keeping the yarn on low heat within its pot and a lid, allowing for a steaming process. Keep checking back on this throughout the process.

Finishing
1. Rinsing and Finalizing
Post-dyeing, rinsing the yarn is essential to eliminate any remaining dye that didn't fully set, preventing bleeding during knitting or blocking projects. Gentle agitation and pressing facilitate dye removal, repeated until the water runs clear. Excess water is then squeezed out as much as possible.
2. Yarn Finishing
Following dyeing and fixing, the yarn is ready for the final stages. Once excess water has been gently squeezed out, place it on a drying rack to allow it to dry. Afterwards, the yarn can be twisted or wound, preparing it for knitting up a beautiful project.


And that's how we dye our yarns in a nutshell! If you ever attempt to dye your own yarn, we’d love to see what you do, tag us on Instagram or Tiktok @Qingfibre
Enjoyed this read? Check out more tips and tricks in our other blogs.